Stepper motor drive
Integrated circuits intended to drive stepper motors
are many and are rather easy to operate because they contain
both logical circuits and power circuits
in the same chip. You just have to choose the circuit corresponding
to the type of stepper motor you want to use,
namely unipolar (6 wires) or bipolar (4 wires).
In the first case, we can use a SAA on 1027 (difficult to find now) or a more powerful UCN 5804. For the bipolar motor, the SAA 1042 (idem) or the MC 3479 will be quite indicated. Most of these controllers allow to work in half-step mode.
It is to note also that we can drive a unipolar motor with a controleur for bipolar motor but that the opposite is not possible.
We propose here a plan of driver for
unipolar motor realized with 2 common logic components and a power
circuit. It is possible to drive motor needing 500 mA by coil, what
should be sufficient in the present frame!
|
||
|
Pin Assignments for CD4070
Pin Assignments for CD4013
|
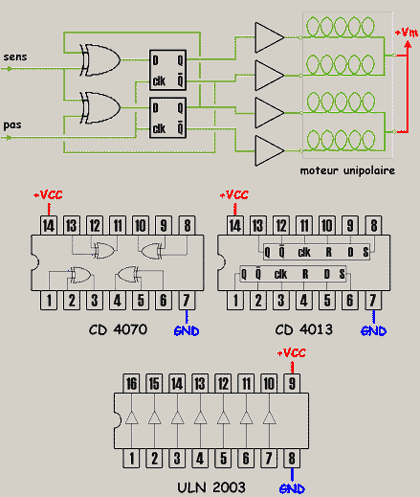 |
Pin Assignments for CD4093
Components list
IC :
quad. XOR = CD 4070 or 4030 Dual shift register = CD 4013 Ampli = ULN 2003 Unipolar stepper motor |
|
Stepper motors can be found on old floppy
disk drives or printers for example. In certain cases we can even use
the controllers who are joined to it. 2 control pulses can result from a
microcomputer (parallel port) + line buffers.
| ||
Monday 13 February 2012
Stepper motor drive
Analogic / Digital converter
Analogic / Digital converter
This integrated circuit (AD
7821) allows to convert an analogic signal in a 8 bits value with a 1 µs
conversion time, thus with a 1 MHz frequency. There are faster
converters allowing to obtain a better resolution (10, 12, 14 or 16
bits).
|
||
|
Pin Assignments for AD7821
|
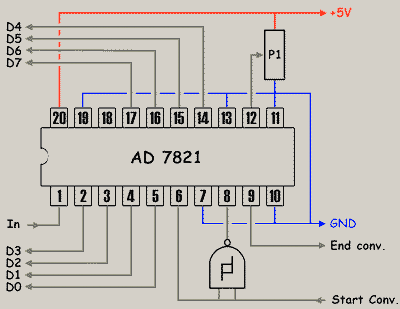 |
Components List
Pot. : P1 = 20 kΩ
A/D Converter = AD7821 trigger inverter = 1/4 CD4093 |
|
The signal resulting from the amplifier is
applied to the pin 1 (Input). The reference voltage is adjusted by
means of P1. It is very summary but that works. We can also use a
specific component to obtain this reference voltage (zener diode for
ex.).
The pulse "start of conversion" results
from the clock generator (having a 5 V level compatible with the
converter) and the pulse "End of conversion" is sent to the PC
interface, as well as 8 bits data. We can also send these data through
buffer circuits (74245 by eg) to secure the exchanges
interface-converter. The logic gate (1/4 CD4093) can be another
inverter.
| ||
Subscribe to:
Posts (Atom)